Sunlight or Shade (Part 3): You’re taking an outdoor portrait and you found the best shade (see last week’s article). But … whoa! … what’s going on in your background?

Not the best location for your subject!
I didn’t know humans had antlers. Taking a portrait outdoors is more than just about the person you are photographing. It is also about the environment they are in. Having a background that is distracting (light pole sticking out of their head, or a tree branch looking like an antler) will take the viewer’s eye away from your subject and onto the background. You don’t want that! The background behind your subject should bring focus to your subject, not take it away.

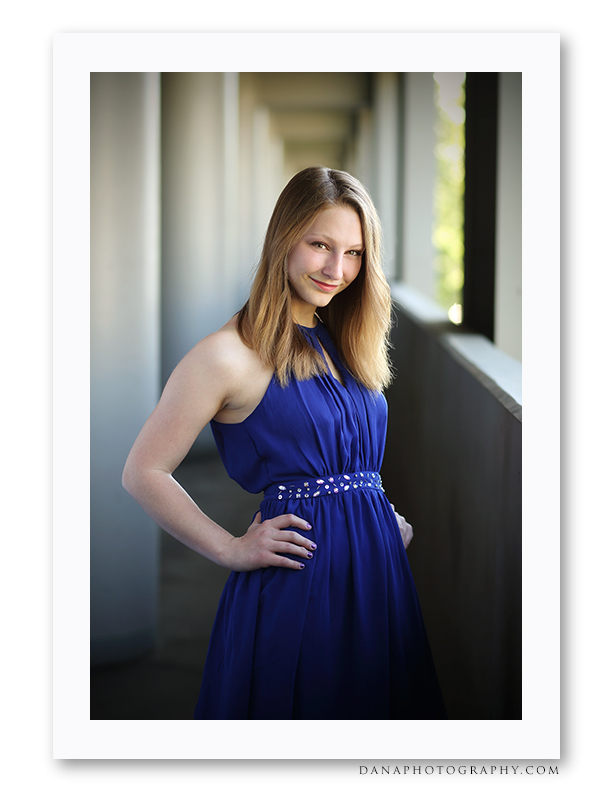
Your background is just as important as your subject, and should bring the focus in on your subject. - Image © Dana Attebery
Check the background. So, once you have found the right shade for your portrait by using the palm of your hand (see my previous blog post “Portrait Lighting - Part 2), look past your palm to see what the background is like. Remember, your background should bring emphasis to your subject. This can be done either by:
a) using the background as a frame to draw the viewer’s eye inward toward the person or
b) ensuring the background is not distracting, such as what happens when you intentionally make the background go out of focus.
Move just a little bit. If you find good shaded light by using your palm and see that the background is distracting, simply move your subject to the right or left within that shaded area, or do a very slight turn to the left or right to get a different, but less distracting background.

In this image I moved the subject to the left to prevent the tree in the background from coming out of her head. By doing that, I was able to use the two trees to frame my subject and bring the focus and attention in on her. - Image © Dana Attebery
I’m taking questions for future blog content. Email your questions about your camera or how to take better photos to info@danaphotography.com. I look forward to answering some viewer questions in upcoming blogs.
Want to know more now and take better pictures this summer? I provide 1-hour, customized 1-on-1 or small group training sessions. I will customize the training to your photo and camera questions and help you become more creative and confident in taking your own pictures! Invest in an hour… and enjoy the ongoing results! Call or email for details and pricing.
Dana Attebery Photography - serving you through portraits, headshots, product photography, commercial and editorial photography, 360-virtual tours, fine art images, and 1-on-1 lessons.
info@danaphotography.com 626-374-3638 danaphotography.com